Thursday, December 22, 2011

"Girlfriend" Gifts


Merry Christmas Stamping friends! I'm glad you took a few minutes during this busy time to stop by and see me!

Last night I had dinner with four of my close friends. It was sort of a little "last hurrah" before Christmas. Everyone is so busy so its hard to get more than two friends together in the same place at the same time so I feel very blessed to have been able to be with FOUR !

Anyway, I wanted to give them each a little hand stamped goodie. Just a little love ya kinda thing.
So I started surfing the web and I found this project on Sunny Stampin website. Andrea Walford is a great source of inspiration.
Unfortunately, I am not a member of her site so I was only able to see the picture of the project, no directions. But I was able to come up with my own little take on it. I don't know if its the same as hers but it worked for me and what I wanted to do with it so I guess that is what matters.


I took pictures of all the outsides, but I neglected to take a picture of the inside. So, I will just have to tell you about the inside. lol

Inside each of these little packages are two bottles that I decorated to match the outside of the package. I filled one bottle with kisses and the other with M&M's. They turned out really cute and were super easy to do!


I used Stampin' Up!s paper flowers and a sponge to make the flowers on the front. LOVE this! It was so easy and I was able to match the flowers perfectly to the designer series paper!
Also, if your a paper hoarder like me, this is a perfect way to use up some of that designer series paper you have laying around. Each box and set of bottles used one full sheet of DSP.
Some extra little touches, I used the large oval punch to punch the handle and then added the scallop punch around it and also, to hold it shut, I used some gem brads! Oh, and if you look at the centers of the flowers, I used jumbo brads to hold them together.
I hope you enjoyed this post and if you have any questions, feel free to email me or leave a comment on this post. I will do my best to answer them!
Until next time,
Merry Christmas!
Now,
GO GET YOUR FINGERS INKY!
Shelly

Wednesday, December 7, 2011

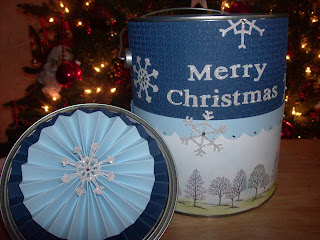
Decorated Paint can

Every December, instead of doing a project at stamp club, we have a Christmas party. We all decorate an empty paint can and fill it with a gift to exchange at our party. We have so much fun with this as we do a Chinese Auction. It gets pretty wild sometimes when there is a REALLY GOOD gift! lol


So I thought I would share with you MY paint can that I decorated this year.


I took the snow burst embossing folder (124096) from the Holiday mini catalog and embossed two sheets of Night of navy card stock. I used the red tape to adhere it to my bucket. Then I stamped the trees from lovely as a tree (115026) along the bottom of some whisper white card stock. I used a finger dauber and added some green to the grassy area and a


sponge to add some light blue to the sky area. I added that to the paint can. Then I cut the scallop strip using the tasteful trim die(120893) and my big shot. I used the silver glitter paper(124005) and Naturally Serif (113453) to cut the words "Merry Christmas" and added them with mini glue dots. I cut the snow flakes out using the Snow flakes #2 sizzlits (113449) and added them randomly around the can. These pictures don't do the snow flakes and letters justice!
I made two huge lollies and added a snow flake to the top to cover the lid. I'm still working on perfecting the lollies...I'm not so good at them yet but you know what they say, practice makes perfect! If you look really closely, you can see the gem in the center of the snowflakes.


Here is a close up of the letters and snow flakes so that you can see a little more detail.

I also added the gems to each of the scallops.

I think the paint can turned out pretty nicely. If I can just master those lollies now! LOL


Until next time,

GO GET YOUR FINGERS INKY!

Merry Christmas!

Shelly

Tuesday, December 6, 2011

Tis the season!


Its that time of year again, when we are desperately searching for the perfect gift for each person on our gift list. Unfortunately, as much as I would love to be able to get everyone exactly what they want, it is just not possible! So, the solution..... Gift cards! I fought the idea of gift cards for years and years. I just felt like they were so impersonal and made me feel like the person giving it didn't care enough to take the extra time to find that perfect gift.
Well!!! Let me tell you, now that I have two teenage boys living with me, I see gift cards in a WHOLE NEW LITE!!!! lol

I constantly cruise the information highway looking for ideas for projects and I came across this one. ( If you know whose original idea it is, please let me know and I will give them credit. )

It is a gift card holder, Christmas card and box of chocolate all wrapped up in one sweet little package!

I did a "last minute mini class" on these this past weekend and I think the guests all loved the idea and several of them have already started recreating them in mass quantities for those last minute, unexpected guests and office workers gifts!


I think they would also make the perfect Teacher Gift, Mail carrier gift, hair dresser gift ect!

And you don't have to stop at Christmas either! They can be modified for birthday gifts or just cause you love me gifts! Ohhh Valentines day is just a few months away... The possibilities are endless~!

I hope you have a Very Merry Christmas!
Until next time,
GO GET YOUR FINGERS INKY!
Shelly

Monday, November 21, 2011

Get em while their hot!

Can you believe its already time for Thanksgiving and Christmas Shopping?! Wow, time just flies this time of year! But take a few minutes and go visit my online store to find some fabulous deals that Stampin' up! has to offer! You wont be disappointed~

Tuesday, October 25, 2011

Grateful Greetings


I just love this time of year! As a matter of fact, it is my absolute favorite time of year! I love Halloween, Thanksgiving and of course I adore Christmas! So this is the beginning of the fun for me!

I love everything about this time of year, the colors, the brisk temperatures outside. Camping in the mountains and sitting by the warm campfire. I just love it all!


This card features a technique called emboss resist. By stamping on white card stock with clear embossing ink and clear embossing powder, the images will resist any ink applied to the card stock. It is a very easy technique but gives a great effect, don't you think?

If you have any questions about this technique, please feel free to email me!

Until next time...

GO GET YOUR FINGERS INKY!

Shelly

Sunday, October 2, 2011

Up and away!


It is such a beautiful day today! The sun is shining, the birds are singing! It is nice and cool out side and it makes me just want to smile!


So, I thought today would be the perfect day to share with all my stamping friends, this card.


Doesn't this card make you wanna go pack a pic nic lunch, load the family into the car and head to the nearest park? Ok, sit down and take some deep breaths, the feeling will pass in a minute. LOL!


But seriously, here is a shot of the inside of the card. It seems to me that a lot of cards are fussed about on the outside, but we neglect the inside all too often.

I have been really working hard lately to try to make the inside feel less like the red headed step child. So I have been giving them more attention and I am happy with the results I have been getting.


But lets not forget that the inside of the card is not the only thing that gets neglected... That's right! The only thing that gets neglected more than the inside of a card is the ENVELOPE! So while you have all your stamps inked up anyway, go ahead and give the envelope a little bit of TLC! Not only will the person you are mailing the card to get a smile but the post office workers and mail carriers might get a much needed boost too!


Now you don't have to do elaborate work on the envelope, but a little somethin somethin here and there wouldn't hurt!


I hope you enjoyed this card, and until next time......

GO GET YOUR FINGERS INKY!

Shelly

Thursday, September 22, 2011

Last two

I thought that I only had one more card that I made with this set but it turns out I had two. So, instead of going back on my word...I decided to post them both in one blog post.
This is just a light and simply card that can be used for really any occasion. I sponged some blue around the top of the image and some green around the bottom. This just anchors the image so that its not just floating out there in space.


I wanted to show you a little bit of the detail that I added. Normally, I would just add several pearls all the same size but I thought it would be a nice little twist to put two sizes together.


And don't forget to decorate the inside of the card as well.


And this is the final card in the series... I'm not saying that I wont ever post another card using this set cause I'm SURE I will. lol But for now... this is the last one. I don't know what it is about this tree that is so appealing to me. I was in a craft store the other day with some friends and every stamp that I picked up consisted of branches that were similar to this tree. Who knows why...lol


And again, give the inside of your card a little bit of attention too. No one likes a naked card! LOL

Ok friends, until next time....
GO GET YOUR FINGERS INKY!
Shelly

Wednesday, September 21, 2011

Third card in series!

Here is the third card I made using this beautiful set.
I love how feminine this card turned out. Believe it or not... the ruffle around the silhouette is actually made using paper!


Here you can see a close up of the frame. I used the
Eyelet border punch (119853) on a piece of Beau Chateau Designer series paper (122357) then ran it through the crimper several times to really break it down. After I gathered it and attached it to the back of the frame (Designer frames embossing folder - 12310) I used a sponge and inked around the edges with Early Espresso ink (119670) to give it a worn and antiqued look. I also rubbed the sponge lightly on the frame its self to make the details of the frame a little more visible.


I hope you are enjoying these cards as much as I did making them. I believe there is ONE more in the series and then I will move on to something else. I'm sure by that time, you will be ready to see something new too!

As always, if you have any questions, feel free to email me or leave a comment on this blog post.
Until next time,
GO GET YOUR FINGERS INKY!
Shelly

Sunday, September 18, 2011

Forever young


My last entry, I told you that I picked another set to use that was not my style. Over the next few days, you will see what I have done with the set. This is card number 2 in the series of this set.


This set really lends its self well to this color scheme. It works great with antiquing. Which just happens to be one of my favorite styles. RIGHT NOW anyway. lol

Sets used:

Forever Young - 122572

Word Play-120651

Card Stock:

Early Espresso - 119686

Crumb Cake - 120953

Very Vanilla - 101650

DSP- Beau Chateau - 122357

Misc.:

1" circle punch - 119686

3/4 " circle punch - 119873

Top note die- 113463

Big Shot - 113439


This shows the inside of the card.. Now it is very hard to see but I used very vanilla card stock and sponged some crumb cake ink around the edges then I inked the clock stamp with crumb cake and stamped off onto some scratch paper then stamped onto the vanilla so that there was just an ever so slight image. It just finishes the card off.


Until next time friends...

GO GET YOUR FINGERS INKY!

Shelly

Friday, September 16, 2011

Happy Birthday!

To my sweet friend Cheryl!
I have absolutely fallen in love with this set as you will see over the next several days! Again, I have gone outside of my box and picked a set that I normally would not have given a second glance at!

Once I started playing with this set, I couldnt stop. Alot of times, I will use one or two stamps in a set but this set I have used them all but one! Fear not though, I am sure that in time, I WILL use the final stamp as well. lol

I hope you enjoy this card and the others that will follow in its inky foot steps!

Until the next time... Another big happy birthday wish to Cheryl and to the rest of you....

GO GET YOUR FINGERS INKY!!!!

Shelly

Thursday, September 1, 2011

Finally!

I finally did another video! I have been wanting to do one for a while but goodness gracious doesn't life just seem to get in the way sometimes!
I had fun making this tutorial.... oh who am I kidding! I have several bald patches in my head now! LOL But I finally got it figured out, edited and uploaded! So I hope you enjoy it! Make sure to leave a comment after and if you make a side step card and would like me to share it on my blog, email me your link!
Until next time stamping friends....
GO GET YOUR FINGERS INKY!
Shelly

Tuesday, August 30, 2011

Shelli and Shelly


No card today.... just a picture of Me (Shelly with a "Y") and Stampin' Up!'s first lady Shelli Gardner. This pic was taken at the Charlotte NC regionals.


Shelli is such a dynamic speaker and so sweet! I was thrilled to be able to meet her again. (third time)


Until next time stampers....


GO GET YOUR FINGERS INKY!!!!

Monday, August 29, 2011

Side step card

This is a card I made for my Mother in laws husband for his birthday.
It looks like it is hard to make but actually it was pretty easy. What made it even easier was Stampin' Up!'s newest tool! Im so excited about this new tool! It's called "Simply Scored Scoring Tool". Thats right! Starting Sept. 1st you will be able to order your very own Stampin' Up! Scoring tool! I can't show you a pic of it yet as it is not available for sale yet.
It's not just another scoring tool either.... it has lots of extras! So be watching for that! But for now, lets get back to the card at hand!


Her you can see what the card looks like from the side. If you would like to try one of these cards yourself, don't hesitate to email me and I will give you the measurements.

What I used:
Always Artichoke C/S - 105119
Whisper White C/S - 100730
Fright Sight DSP - 122351
Always Artichoke ink - 105219
Hemp Twine - 100982
Stampin' Dimensionals - 104430
Lovely as a Tree 115026
Curly Cute - 120510
And of course, The Simply Scored Scoring tool!

If you have any questions or comments, please feel free to email me or leave a comment on this blog post.

Until next time stampers...
GO GET YOUR FINGERS INKY!!!


Friday, August 19, 2011

Pink Cowboys!


I wanted to share my second swap card for Regional tomorrow. I told you last time I used this set that it was out of my box. Well, I'm finding my box is getting a little bigger! Cause this set is rapidly becoming my new favorite!


How cute it this set done in PINK! Don't you think it is the perfect set to use for a birthday party theme? Pink for girls, blue for boys!


Here is a close up of some of the details... The boots are cut out and popped up with some stampin dimensionals.


I also used some silver brads and linen thread


Here is a shot of the inside of the card. Simple but effective!


Finally a shot of the whole group of cards! So sweet. I love them. I hope the other demo's at the Charlotte regional enjoy them as much as I do.

Until next time,
GO GET YOUR FINGERS INKY!
Shelly


Tuesday, August 9, 2011

SU Regional share


In July every year, Stampin' Up! has their national convention. It is a very exciting time for demonstrators because we get to see all the new products and fun stuff that Stampin' Up! has to offer.
Unfortunately for me, I am not able to go to convention.... sad I know! lol BUT all is not lost. Stampin' Up! offers regionals in several different areas of the country and I am very excited to say that Charlotte NC is the site of the very first one! That is just 30 minutes up the road from me!! WOOOHOOO!

So, one of the fun things that you do at conventions and regionals is card swaps. This is the card that I will be making and taking with me to swap with the other demos at regional.


Until next time,

GO GET YOUR FINGERS INKY!

Shelly


Thursday, August 4, 2011

One Sheet Wonder Card

Don't you just LOVE this color combination! These are two of the new In-Colors from Stampin' Up! They are called Pool Party and Wisteria Wonder. I absolutely love them!
Anyway, I made seven cards out of ONE piece of 8 1/2 x 11 Whisper White card stock. I stamped the images all over and cut it up. It is amazing all the different looks you can get from just that one piece of Card stock!
Go experiment!
Until next time,
GO GET YOUR FINGERS INKY!
Shelly

Wednesday, August 3, 2011

Delicate Doilies!

For stamp club each month, we have either a color theme or event/holiday theme.Each member of the club is supposed to make a card or stamped item that fits into this theme. Of course, its not mandatory... just something fun for everyone to get their hands inky and use the goodies that they purchase every month. This month, the theme was "Back to school OR Yellow". I chose to to go with the Yellow theme.
So I picked the new set "Delicate Doilies". It is such a pretty set and I can't wait to use it with different color combinations!


One of my favorite embellishments lately is the self stick pearls and gems! You gotta love em! They are definitely a lotta bang for the buck!


And of course, no card of mine would be complete with out a little bit of sponging! Lol.. I really
do love that technique. It just finishes the card off so nicely!


As a little note of interest, I used the new punch Lace Ribbon Border. This punch was very stiff when I started using it. The more I used it, the easier it became to use. So keep in mind that if you purchase this punch in the future, it may be a little stiff to begin with but don't give up on it... it does get easier!


Until next time!

GET YOUR FINGERS INKY!

Shelly


Monday, August 1, 2011

Just For You!

My goal with the new catalog was to purchase some sets that are totally out of my box. And with this set, I couldn't be further out of the box! However!!! It turns out that I really liked this set and had fun using it. I really love the neutral color pallet and this set lends its self beautifully to the neutrals!


This is what is called a Criss Cross card. It takes a full sheet of card stock but the finished card really is stunning! Although this stamp set is not my style, I did find ways to add my own personal little feminine touch to it. Look at the tiny little pearls on the tag! I love it!


I encourage you to go out side of your box the next time you stamp. Try a new fold or technique or really go out on a limb and try a new color pallet! You just might surprise yourself!


Until next time...

GO GET YOUR FINGERS INKY!

Shelly


Saturday, July 30, 2011

It POPS!

UP that is~! When you open this card, you get a nice little surprise.


This is a card that I did with my club girls last month. I wanted to show them how easy it is to get some real
pizazz in your card without alot of fuss!

So when you open this card, the flowers and the butterfly pop up to greet you!


Here is a side view of the card for you to get an idea of how the "pop" portion of the card looks!


I hope you have enjoyed looking at my blog today! If you have any questions, please feel free to email me at stampmomx2sc@comporium.net or leave a comment on this blog post.


Until next time,

GO GET YOUR FINGERS INKY!

Shelly

Wednesday, July 13, 2011

retired sets for sale

Here is a list of my retired sets that I am hoping to find happy new homes for!
If you would like any of these sets, please email or call me! I am happy to ship. Actual shipping charges will apply.

Clear mount sets
Jolly old St. Nick $8.00
Its the thought $8.00
Love and Care $10.00
Silhouette Sentiments $8.00
So happy for you $8.00
Apple Blossoms $8.00

Wood Mounted sets
Tart and Tangy $5.00
Background Basics $5.00
Itty Bitty Backgrounds $5.00
A Flower for all Seasons $6.00
Branch Out $10.00
Animal Crackers $10.00
Congrats $6.00
Yukon $8.00
Sprinkles $6.00
Wonderful words $6.00
Animal Stories $8.00
Just Jawing $10.00
A Good Egg $10.00
One of a kind $8.00
Fresh Cuts $8.00
Its Your Birthday $12.00
Contemporary Alphabet $15.00
Pure and Simple Alphabet lower case $15.00
Bold Alphabet Lower $15.00
Big Deal Alphabet $15.00
Pun Fun $15.00

accessories
Three baggies of ribbon $10.00 each
Baggie full of eyelets $7.00
1/4 inch square punch $3.00
Small five petal flower $5.00
corner notch punch $5.00
1/4 inch circle punch $3.00
Small snow flake punch $3.00

lots of designer series papers, price depends on amount of paper purchased.
lots of 12x12 retired colors card stock. price depends on number of sheets purchased.

Thank you for looking at my goodies! It will make me very happy to pass them onto someone who will enjoy them!
Until next time,
GO GET YOUR FINGERS INKY!
Shelly

Tuesday, July 5, 2011

Happy birthday!


This is a card that I made
recently.
I picked my stamp set, then I picked
my colors. I stamped my image and
put the card together
but I just was not happy with it.


So, I added a butterfly to the card. This made it better but still I was not totally happy with it.


I pulled the card apart and stamped some grass onto the background and moved some pieces around and I think that I am finally happy with the out come.


Enjoy and until next time,


GO GET YOUR FINGERS INKY!


Shelly


Friday, July 1, 2011

It's LIVE!!!


Wait till you see what is between the covers of this new catalog!! There are some really great things in here and also a few changes to mention!


The biggest change is the Hostess benefits. There are no longer Hostess levels. Only hostess money! Hostess money can be spent anywhere in the catalog! There are still Hostess only items that are only available to the Hostess but you don't have to buy them with your Hostess money if you chose not to! Please call or email me for further explanation of the benefits or if you need to purchase a catalog, I can help you with that as well! You will not be disappointed with the new catalog/idea book!


Also, instead of five in colors, there will now be TEN. Five from last year and five new ones. Next year, the original five will go away and there will be five NEW in colors. So there will always be ten in colors.


There's lots of new and exciting items in the catalog so if you haven't already purchased one, call or email me today! I will be happy to help you out!


Until next time,


GO GET YOUR FINGERS INKY!


Shelly


Wednesday, May 25, 2011

Red White and Blue


Welcome to the middle of the week!

Each month, my stamp club makes cards according to a theme. For this month, it is red white and blue OR patriotic. Obviously, my card is not a patriotic card but I did accomplish the Red white and blue!

I used the set from Stampin' Up! s summer mini.

It is called The Open Sea (123032).


I love to distress and antique my cards. I am not sure if it will show up or not, but I crumbled the background and then flattened it back out and rubbed crumb cake ink on it to make it look weathered and aged.


I hope you enjoy looking at my creations as much as I enjoy making them!

Until next time,

GO GET YOUR FINGERS INKY!

Shelly

Monday, May 23, 2011

You mean the world to me!


And that is exactly how I feel about the person I gave this card to! Some one very special to me...My sister! I am so thankful for the friendship that has developed as we have become adults.
The sets that I used is The open sea (123032) from the summer mini and Word Play (120651) from the regular catalog.
The card stock is Crumb Cake (120953) Early Espresso (119686) and Very Vanilla (101650).
Inks are Crumb Cake (121030) and Early Espresso (119670)
Extras are Clear Rhinestone brads (113144)
Early Espresso 1 1/4 grosgrain ribbon (119961)

Thanks for looking at my blog... sorry it has been so long since my last post. I have been stamping but for some reason have not been on top of blogging the items I have stamped.
Lets hope this is a turning point!
Until next time,
GO GET YOUR FINGERS INKY!
Shelly

Thursday, May 5, 2011

I'm SO sorry!

Oh my goodness! I can not believe it has been so long since my last blog post!
How shameful! It's not that I haven't been stamping cause I surely have.
Over the next few days, I will try to update my blog and add some new projects for you to enjoy!
So be watching for them soon!
until then,
GO GET YOUR FINGERS INKY!
Shelly

Tuesday, January 11, 2011

Imagine


I started this card the other night when I was stamping with my sister and best friend. I can't tell you how many times I had to redo this card. As simple as it looks, things kept going wrong and I had to keep tearing it apart. I would stamp crooked, or there would be a halo or something just always seemed to get messed up. I finally just put it away and said I would save it for another day. Otherwise, it might end up in a million pieces in the trash!
This AM, I decided it was time to try again. And success! A simple card that caused me so much aggravation finally just came together!
I hope you enjoy it.
Until next time, stay warm and
GO GET YOUR FINGERS INKY!
Shelly

Monday, January 10, 2011

Mmmm Apple pie!

So, we are all snowed in here in South Carolina! I was talking to my sister and she mentioned something about making an apple pie for her family. And didn't that make my mouth water! But since we ARE snowed in, I had no way to get to her house for a piece. Next best thing.... make one myself! I had a big bowl of juicy apples on the counter top so I figured, what the heck...
What does this have to do with stamping you ask... well, for club this month, our card theme was to make a recipe card.
Have you ever made something for someone and they ask you for the recipe? Well, with a card like this, you can give them the food gift and a recipe AND a card all in one!

For this card, I used the perforating tool from Stampin Up! and preforated where the card is folded. This way, once you give the card, they can tear it along the perforation and save the recipe!
What you cant see in this picture is that I used the tiniest pearls (stampin up as well) on several of the branches. They really do add a touch of class to the card. I also added two of the larger pearls to the ribbon .


Unfortunately, you cant see the inside of the card very well, but I wanted to give you an idea of what I did on the inside.
Ideally, if I had made this pie to give as a gift, I would have written the recipe here and given the card with the pie.


And finally, just a little share of the pie its self. It was very yummy! Sorry that I can only share pictures of the pie with you!

Until next time....
GO GET YOUR FINGERS INKY!
Shelly